The slit-lamp fundus examination can be a difficult and disorientating task for beginners due to the retina being viewed in a non-anatomical orientation, the small area of retina illuminated, and the counterintuitive technique of the examination. This article provides a practical guide to the technique of slit-lamp fundus examination for beginners.
A fundus examination with a slit-lamp, for the visualisation of the retina, is a basic and indisposable component of the comprehensive assessment of an eye. This places it amongst the practical skills specialty trainees in ophthalmology need to become proficient in early into their training.
The Royal College of Ophthalmologists’ curriculum for ophthalmic specialist training states that a specialty trainee must become competent in this skill within the first two years of training [1]. By grasping this skill early, undergraduate students and foundation trainees will benefit from making the most out of the ophthalmology placements they undertake (e.g. electives, rotations, tasters, etc.) and an easier transition to life as an ophthalmology specialty trainee.
The slit-lamp fundus examination routinely involves the use of a handheld condensing lens (CL) that is suspended between the slit-lamp and the pupil of the patient’s eye (Figure 1).
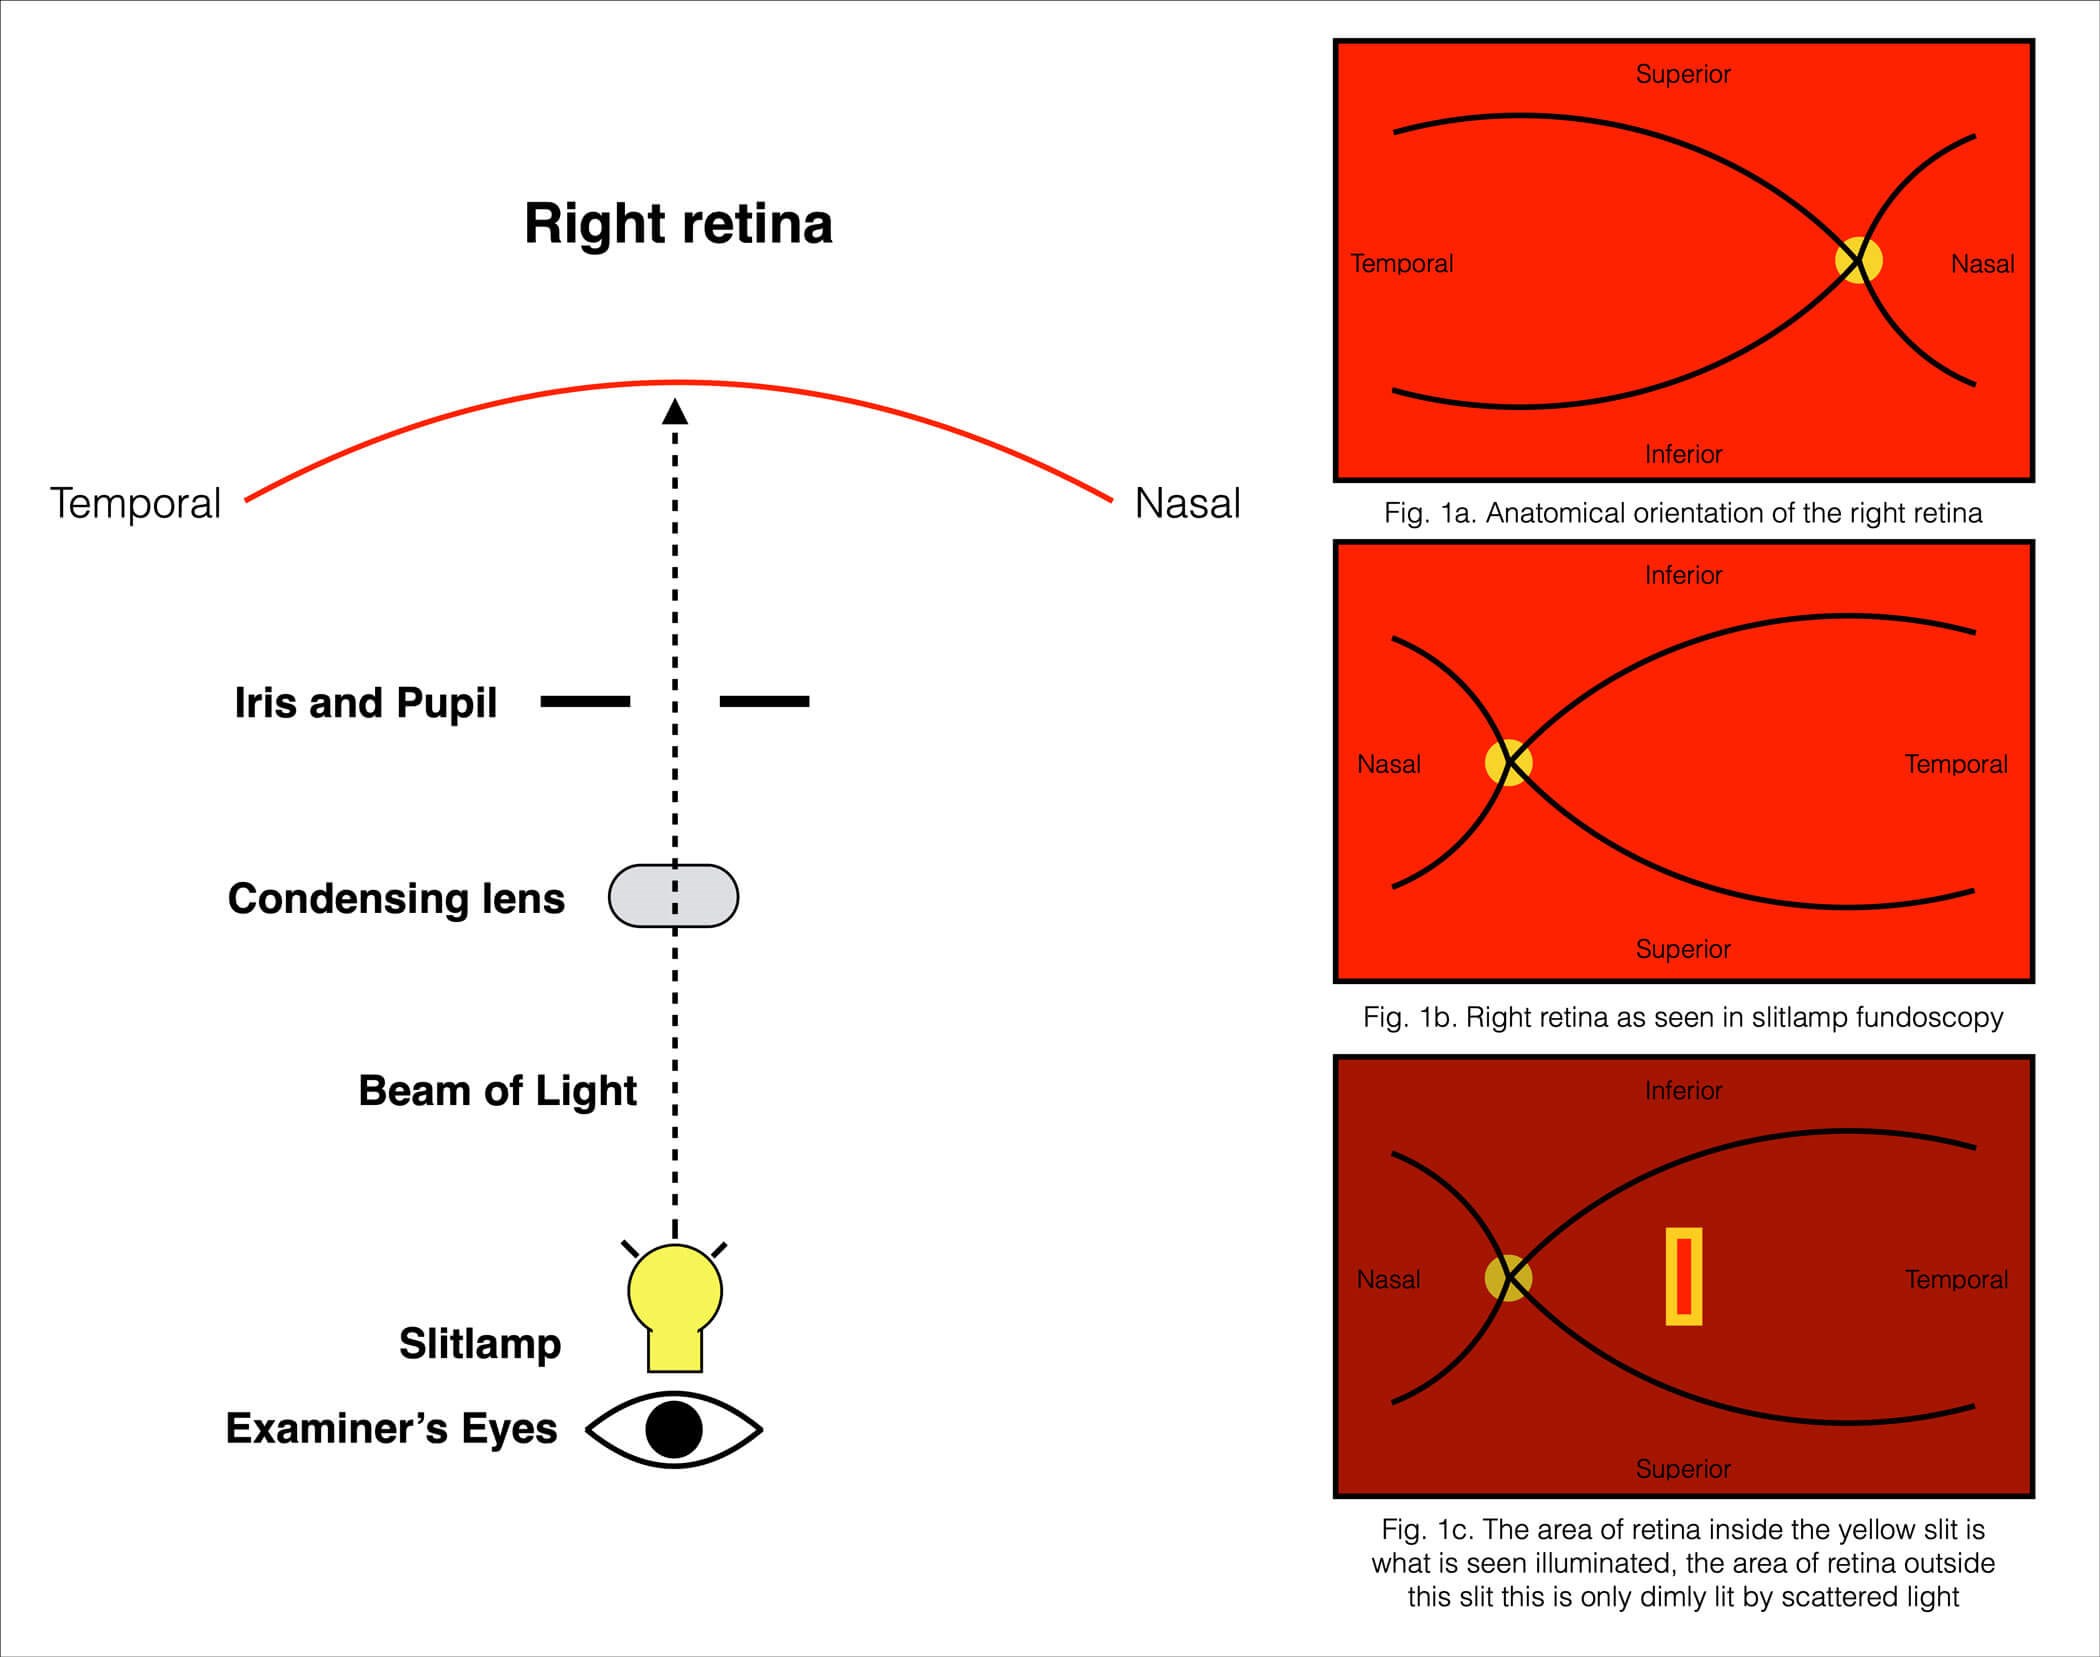
Figure 1: A schematic of the components involved in slit-lamp examination, and an illustration of the image seen.
The proper use of a CL requires constantly maintaining the alignment of the pupil, the CL and the slit-lamp in order to achieve a focussed view of a region of the retina. Coordinated movement of the slit-lamp, and secondarily the CL, while maintaining the alignment and focus allows for navigation across the retina [2]. Combined, these elements create a difficult and disorientating task for beginners for three reasons:
- The retina being seen in a vertically and horizontally inverted orientation (Figure 1a, 1b)
- Only a small, slit-shaped region of retina being illuminated for clear view (Figure 1c)
- The counterintuitive technique of manoeuvring the slit-lamp and the CL in a coordinated manner.
Preparation
Fundus examination with a slit-lamp is commonly done with eyes that have had their pupils dilated, to allow for a larger and binocular field of view. In adult eyes, dilation is usually done with 1% tropicamide and / or 2.5% phenylephrine eyedrops. The examination may also be done with an undilated pupil, however the view this offers is much more limited and is principally used in the assessment of the optic disc alone. In either case, reducing the ambient light in the room is essential as it allows for a lower light intensity to be used on the slit-lamp. This makes the examination a more tolerable experience for the patient and, when examining through an undilated pupil, avoids exacerbating pupillary constriction.
A magnification of 10-15x, with a slit size of 5-10mm in length and 1.5-2mm in width, is adequate for general assessment. The CL used is commonly between 60-90 dioptres in strength and is held between the index finger and the thumb of the hand on the side of the eye being examined. The remaining three fingers of this hand are placed on the forehead rest of the slit-lamp, providing stability for the CL, and the other hand manoeuvres the slit-lamp. Having first moved the slit onto the centre of the pupil, the CL is to be introduced in between the pupil and the slit-lamp, and its position is to be finely adjusted with movement of the fingers holding it until the red reflex of the retina is in centre view. Finally, the retina can be brought into focus, either by pulling the slit-lamp fully back and gradually pushing it forward, or alternatively pushing it fully forward and gradually pulling it back, until a focussed slit on the retina is seen.
Navigation
For practical purposes, the process of panning across the retina with the illuminated slit can be taught and understood more easily with the analogy illustrated in Figure 1. The analogy consists of a slit shaped beam of light originating from the slit-lamp. This beam passes through both the CL and the pupil in succession in order to fall on the region of the retina that it illuminates. Coordinated movements of the slit-lamp and CL change the direction of this beam, and thus change the region of retina the beam lands on. Such changes allow the visualisation of different regions of the retina.
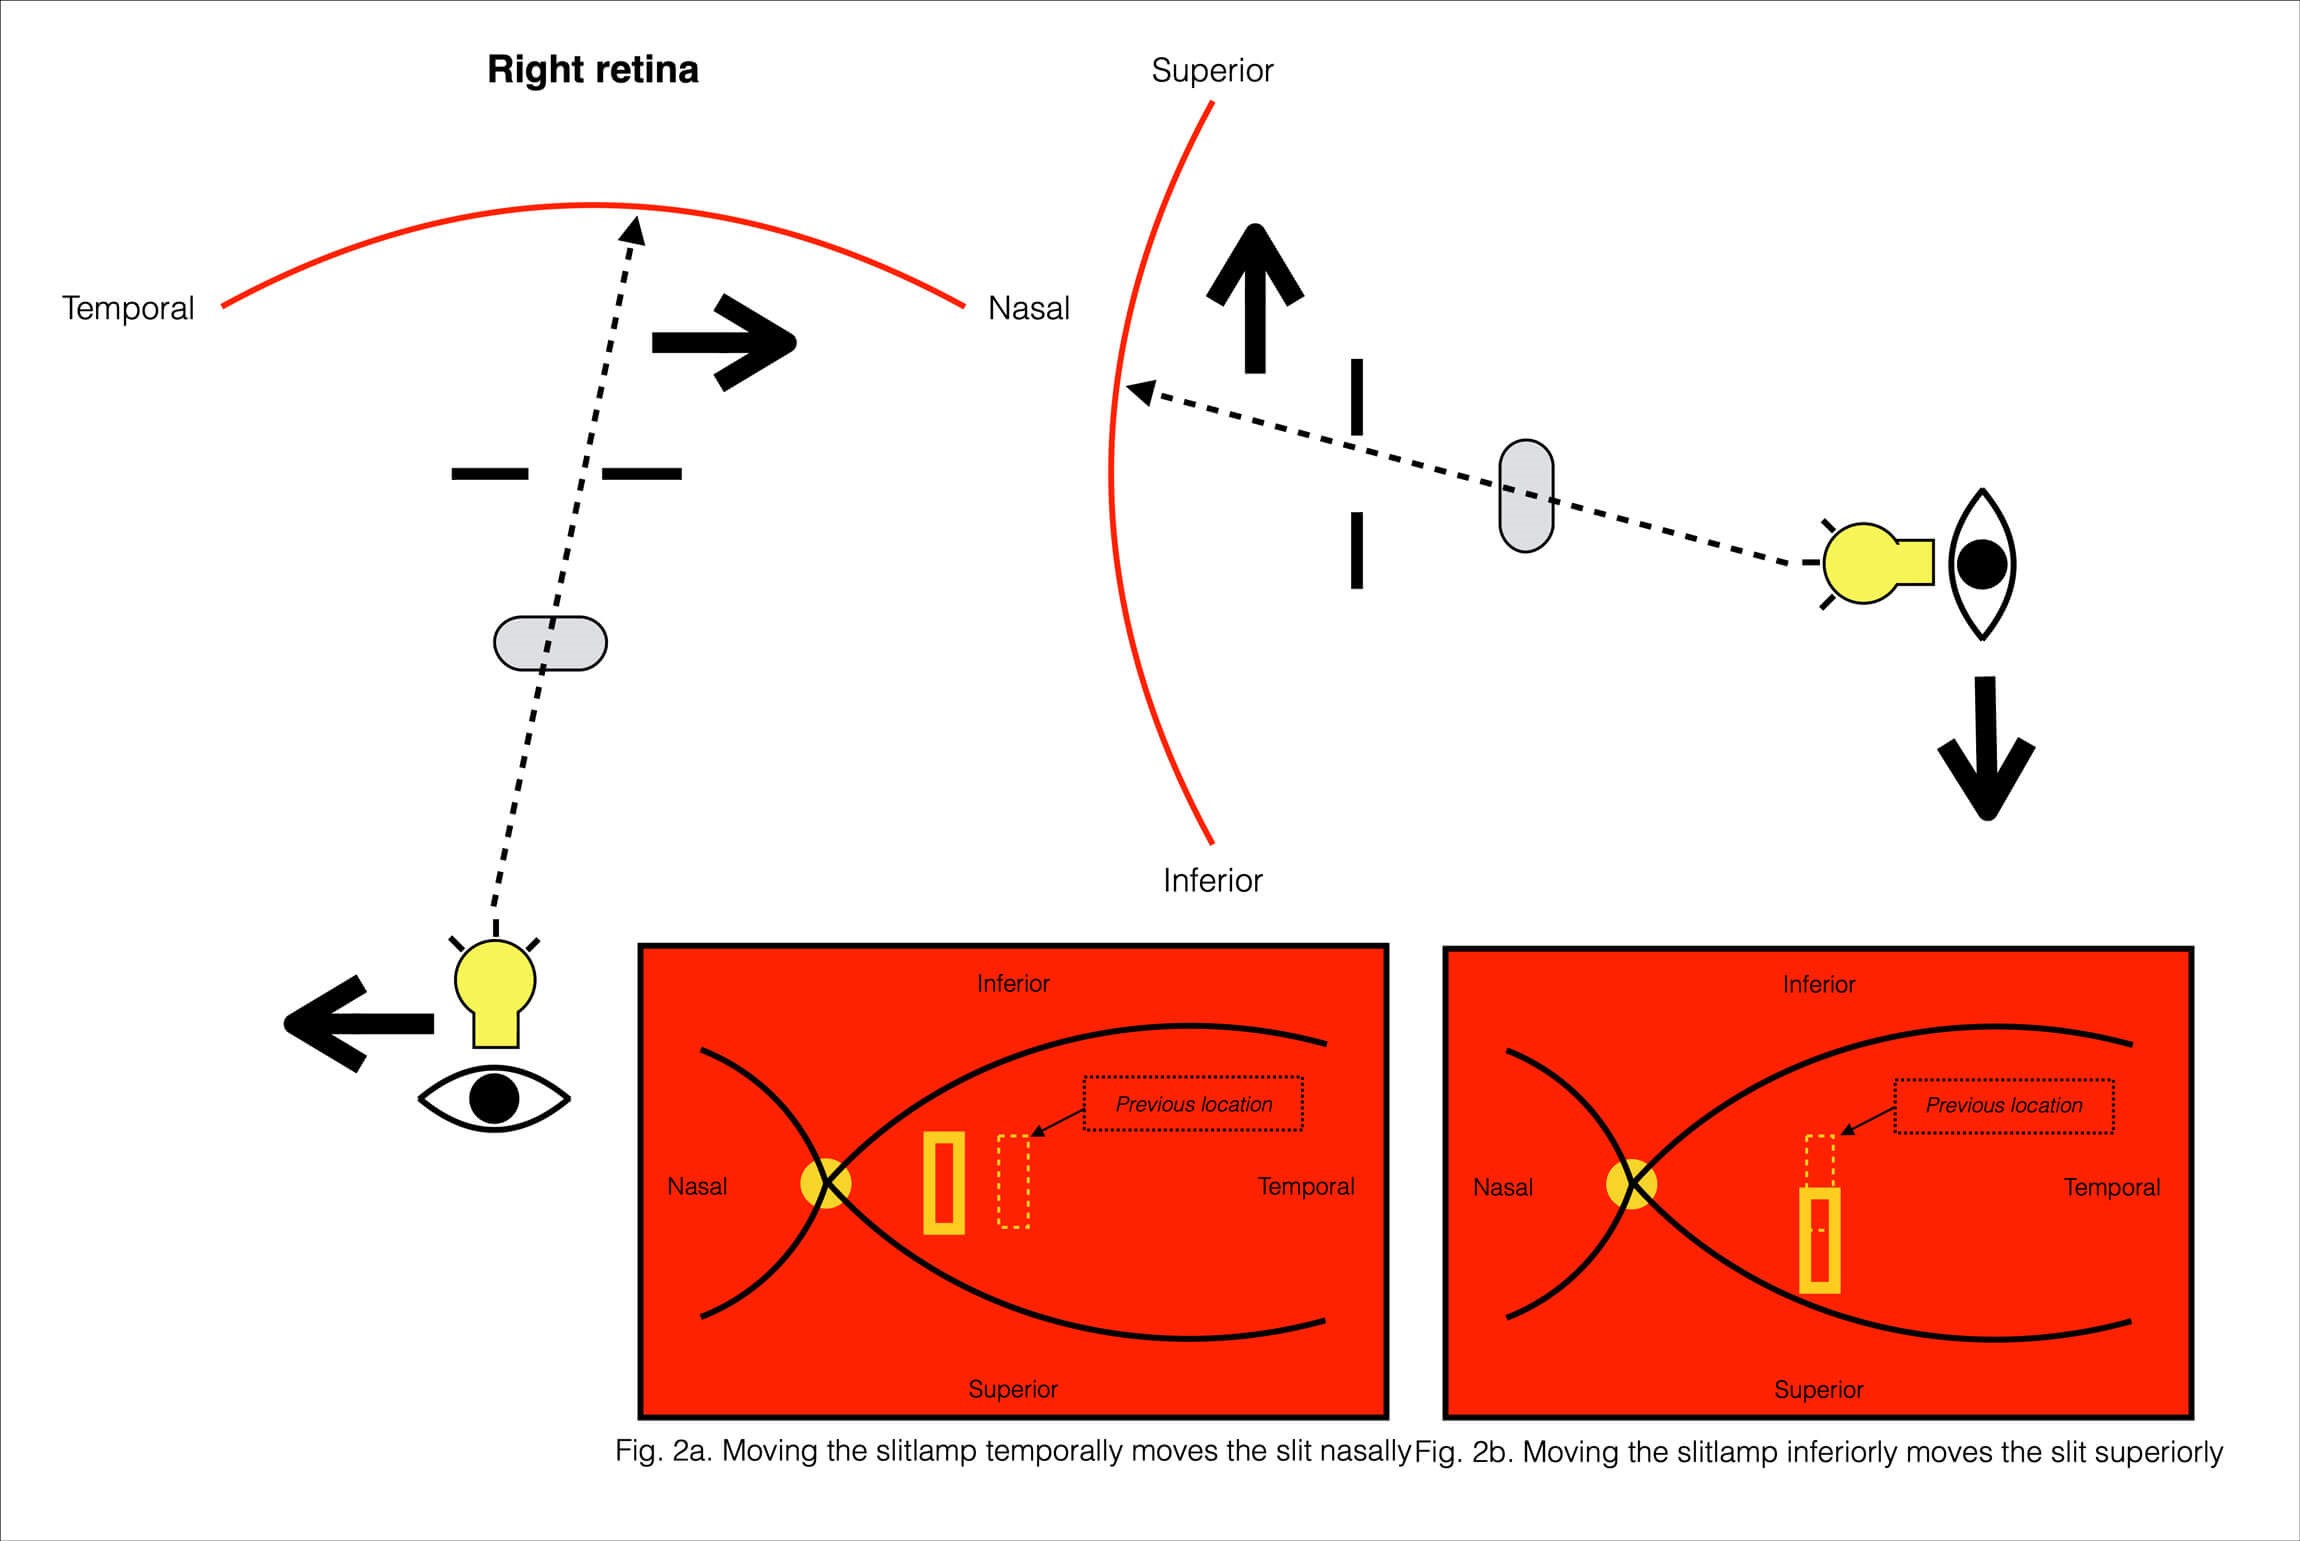
Figure 2: A schematic of the technique of panning across the retina with the illuminated slit.
The slit-lamp and the CL can each be moved in the vertical (i.e. superiorly or inferiorly) and the horizontal (i.e. nasally or temporally) directions to navigate across regions of the retina. Movement of these forward or backward primarily serves the establishment and maintenance of a sharp focussed image. Moving the slit-lamp temporally moves the slit nasally (Figure 2a), and vice versa. Likewise, moving a slit-lamp inferiorly moves the slit superiorly (Figure 2b), and vice versa. As a rule, movement of the slit-lamp in a direction results in the slit moving in the opposite direction.

Figure 3: A schematic of the corrective movement of the condensing lens required to maintain the retina in view.
Isolated movement of the slit-lamp alone eventually starts moving the beam increasingly off the pupil onto the iris. With this, less and less light from the slit-lamp reaches the retina, and the retina eventually ceases being seen once the beam falls entirely on the iris (Figure 3a). This is corrected with compensatory movement of the CL. Movement of the CL temporally will move the slit temporally, and vice versa (Figure 3b); movement of the CL superiorly will move the slit superiorly. Movement of the CL in an oblique direction, results in the slit moving obliquely in the same direction. So again, movement of the CL in a direction results in the slit moving in the same direction.
Patient gaze
The optic disc can be brought into view by asking the patient to look at the examiner’s ear on the same side as the eye being examined. More peripheral regions of the retina can be brought into view by asking the patient to look in the direction of the region to be brought into view. For example, to bring into view the temporal periphery of the left eye, the patient’s left eye will need to look far leftward. Conversely, to bring into view the nasal periphery of the left eye, the patient’s left eye will need to look far rightward. Asking the patient to look straight at the light brings the macular region into view, and this is best done last to avoid dazzling the patient and hindering their tolerance of any further examination of that eye. In all these cases, as the pupil’s position changes with changes in gaze, both the CL and the slit-lamp must be maneouvred appropriately in order to maintain alignment with the pupil.
TAKE HOME MESSAGES
-
The retina is seen in a vertically and horizontally inverted orientation in slit-lamp fundus examination.
-
Movement of the slit-lamp in a direction results in the slit moving in the opposite direction on the retina.
-
Movement of the condensing lens in a direction results in the slit moving in the same direction on the retina.
-
The slit-lamp, the condensing lens and the patient’s pupil, must constantly be maintained in alignment.
-
Changing the patient’s direction of gaze can be used to bring different regions of the retina into view.
References
1. Royal College of Ophthalmologists. Clinical Assessment Learning Outcome 10, Curriculum for Ophthalmic Specialist Training.
https://curriculum.rcophth.ac.uk/learningoutcomes/ca10
[last accessed February 2023].
2. Salmon JF. Kanski’s Clinical Ophthalmology 9th Edition. Amsterdam, NL; Elsevier; 2019:22-3
COMMENTS ARE WELCOME