Asking candidates to perform an examination of the visual system, either as part of a full cranial nerve exam or as an individual entity, is a common station in practical examinations during medical school. It is important to practise for both of these approaches to ensure fluidity and enable you to finish stations within the time constraints.
This two-part article will focus on how to approach examining the visual system alone, but can easily be adapted to form part of your full cranial nerve exam. One basic rule to follow with this examination is to start with the test that is furthest away from the eye, and work towards it. This methodical approach will ensure no element is forgotten when you are nervous and under pressure during important exams. Part one of this article will focus on the first three aspects of the examination of the visual system when approached in this systematic way: visual acuity, visual fields and eye movements.
Preparation
You should start this examination the same as any other practical station, by introducing yourself to the patient and checking their identity. Next, explain what you have been asked to do. Keep it simple, for example: “I have been asked to examine your eyes today, this will involve me testing your eyesight, eye movements and also looking in to the back of your eyes with a bright light.”
If the patient agrees to the test, you should make sure they are seated comfortably. Place your chair about a metre away from theirs. At this point you may wish to bring the equipment that you will need close to your side so the tests run smoothly. You will require a hat pin, a pen torch and a fundoscope.
Before starting the examination proper, inform the patient that you are going to start by asking them a few questions about their vision. Find out if they usually wear glasses or contact lenses, and if they have had any visual complaints previously (some patients in exams will have been told not to give anything away but you don’t know unless you ask!) See if the patient has any questions for you about the test, and then you are ready to begin properly.
Visual acuity
(Cranial nerve II – optic nerve)
Snellen charts are not always around in examinations, but if there is one on the wall make sure you use it. If you do not see a Snellen chart it is always useful to explain to the examiner how you would test visual acuity if one were available, you won’t lose marks for this but you may certainly gain some easy ones.
Ideally you want the patient to be standing six metres away from the Snellen chart. The most important thing to remember is that you test each eye individually – this is one of the commonest mistakes people make during the examination. When the patient has one eye covered, ask them to start at the top of the chart and read along until the smallest letter they can see at the bottom. If they say they cannot read any more encourage them to try the next letter and they will often manage a few more than they thought they could see.
Make a note of the letter the patient got to on their first eye, then get them to swap hands and repeat the same process with the other eye. The patient’s visual acuity on completion of this test is expressed as a fraction e.g. 6/12. The numerator is the distance that the patient is from the chart, and as this test should be done with the patient standing six metres from the chart, the numerator is usually six. The denominator is the distance away from the chart that a person with normal vision would be able to see the line the patient can read. Thus, the patient reading 6/12 can see from six metres a letter that someone with perfect vision would be able to read from a distance of twelve metres. The numbers at the top of the Snellen chart are bigger which means that people with perfect vision can see them from further away than the smaller numbers lower down the chart. This means the denominators get smaller with the reduction in size of the letters on the chart. ‘Perfect vision’ is called 6/6. You may be more familiar with the term 20:20 vision, and this is related to when we measured distances in feet rather than metres.
Thank the patient and ask them to take a seat on their chair. Inform the examiner of the results of the patient’s visual acuity test: “Mrs Smith’s visual acuity as tested by the Snellen Chart is 6/6 in the left eye, and 6/12 in the right eye.”
Things can become more complicated when patients have very poor vision, and they may start by being unable to read the top line at all. One option is to move the patient closer to the chart, just remember then that you will be changing the top number of the acuity fraction, for example to 3 if they are standing three metres away. Unfortunately, reducing the distance from the chart may still not enable the patient to read any letters. The next step is counting fingers, which involves you holding up a number of fingers less than a metre from the patient and asking them to count them.
If the patient is unable to count fingers you should assess whether they are able to see hand movements in front of their face. Lastly, if the patient cannot see any of the above, the final step is to see if they can perceive light. You can do this by shining a pen torch in to the eye and asking the patient when they can see it. If the patient cannot see the pen torch they are said to have no perception of light.
Visual fields
(Cranial nerve II – optic nerve)
There are two things you are looking for when testing a patient’s visual field: visual field loss and inattention (also known as hemispatial neglect). The latter is commonly attributable to strokes, and patients with inattention will in a sense ‘ignore’ everything on one side of their visual field (the side opposite that of the hemisphere where the stroke occurred).
Firstly, it is useful to begin by asking the patient if they can see all of your face, and if there are any parts missing or blurred. This will pick up any obvious gross visual defects (that you may not have established if you missed out the Snellen Chart section).
Next, you can test for inattention quickly and simply so it is usually easier to start with that. Ask the patient to focus on your face and place your hands outwards to each side. Ask the patient to indicate which of your hands starts to wave. Wave one hand at a time and then both at the same time. When you wave both hands together the patient will only report that one of your two hands is moving if they have visual inattention.
Once you have ruled out inattention you can tell the patient you are going to do some further tests on their peripheral vision. Tell them to cover their right eye with their right hand and to keep looking straight at you. If you have a hat pin you are going to use the white coloured side of it. If you haven’t been provided with this equipment it is often sufficient to just use a single finger instead of the hat pin for exam purposes. You can either cover your left eye with your hand, or close that eye itself. Hold the hatpin out with your arm straight and ask the patient to say when the pin comes in to their field of vision. If you imagine the field in front of you as a compass you need to come in from North-East, South-East, South-West and North-West positions in turn. Tips for this part are to make sure one eye is always covered, and to keep reminding the patient to look straight ahead. Once complete, you obviously repeat the same approach on the other eye. This test is quite difficult to do well, mainly because it is hard to see where your hand is without looking at it, and even harder to keep it equidistant from you and your patient. Good advice would be to move the pin slowly and don’t be afraid to test a couple of times if you are unsure.
If a patient has a visual field defect try to explain it to the examiner using the correct terminology. See Figure 1 for some reminders.
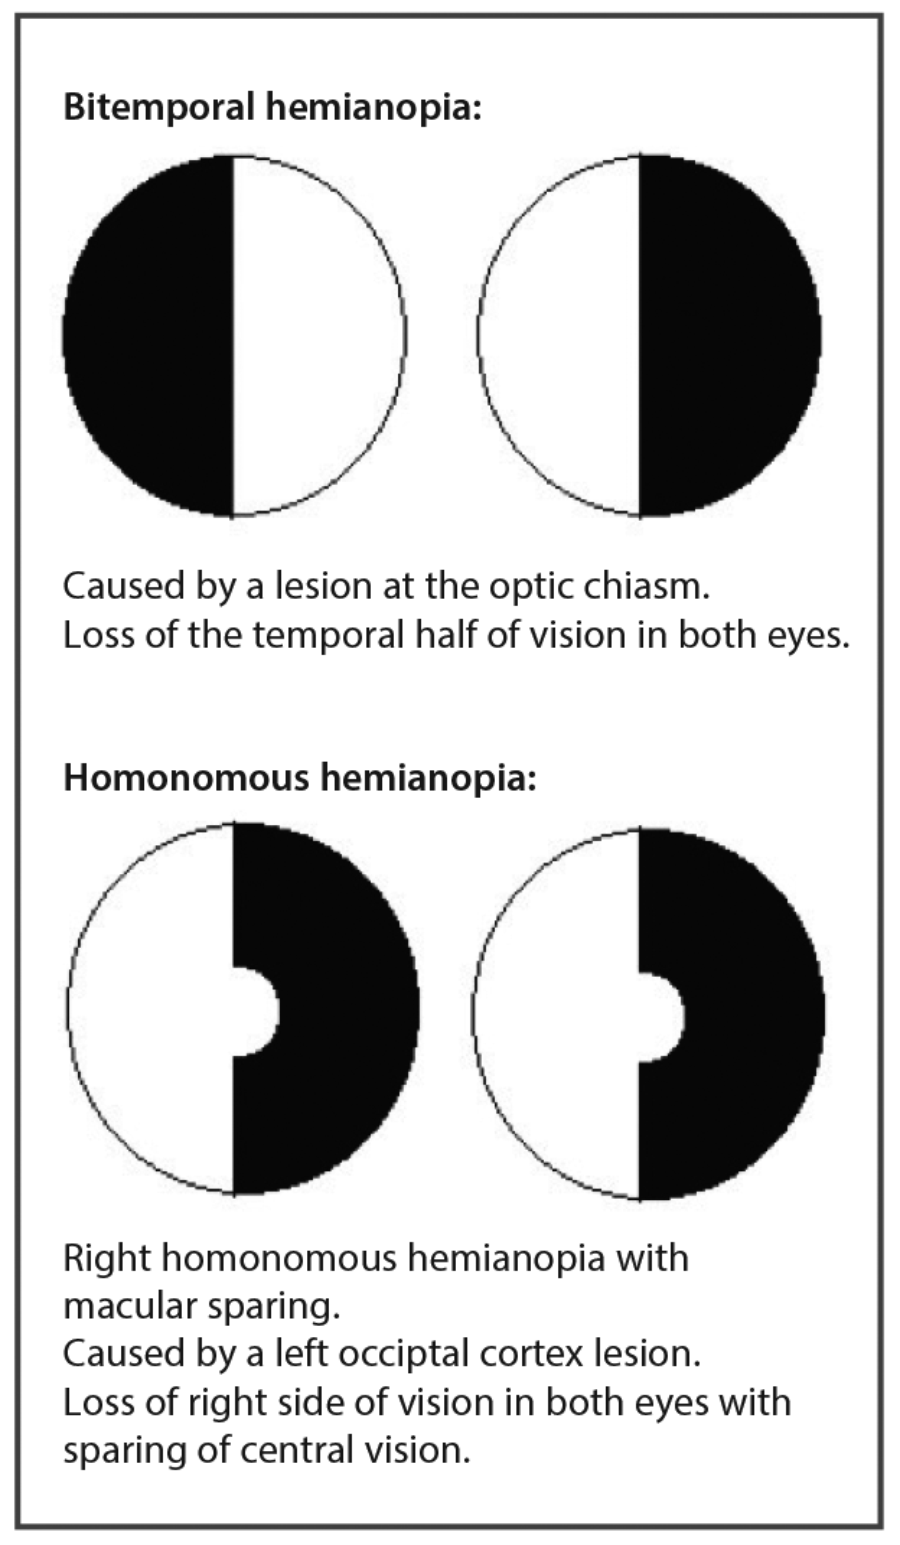
Figure 1: Visual field defects.
It would be helpful at this point to look over the anatomy of the visual pathway, and remind yourself how the visual field defects relate to the site of the pathology which is causing them. For example, if you think a patient has bitemporal hemianopia, the pathology must be localised to the optic chiasm and thus you would want to do tests relating to pituitary pathology etc.
Eye movements
(Cranial nerves III, IV and VI)
At this point you are doing your first observation of the eyes themselves. It is therefore a nice idea to make a quick comment to the examiner about the appearance of the eyes. For example: “Looking at the eyes in general, I can see that their resting position is normal, the eyelids show no evidence of ptosis and the pupils are equal in size and shape.”
Next, explain to the patient that you want to assess how well the muscles around the eyes are working and in order to do that you are going to ask them to keep their head completely still, and to perform some movements of the eye. Ask them to focus on the tip of your index finger which you should hold up in between you and the patient. Remind them again not to move their head, and to follow your finger with their eyes as it moves. Also request that the patient informs you if they suffer double vision at any point.
Begin moving your index finger slowly to map out the shape of the letter ‘H’. Focus on the patient’s eyes, looking for any nystagmus (flicking of the eyes) or extraocular muscle palsy (inability to move the eye in certain directions, also known as ophthalmoplegia).
At this point it may be useful for you to refresh your memory on the orientation of the extraocular muscles and the direction in which they each control movement of the eye. You may find Figure 2 a useful revision tool.
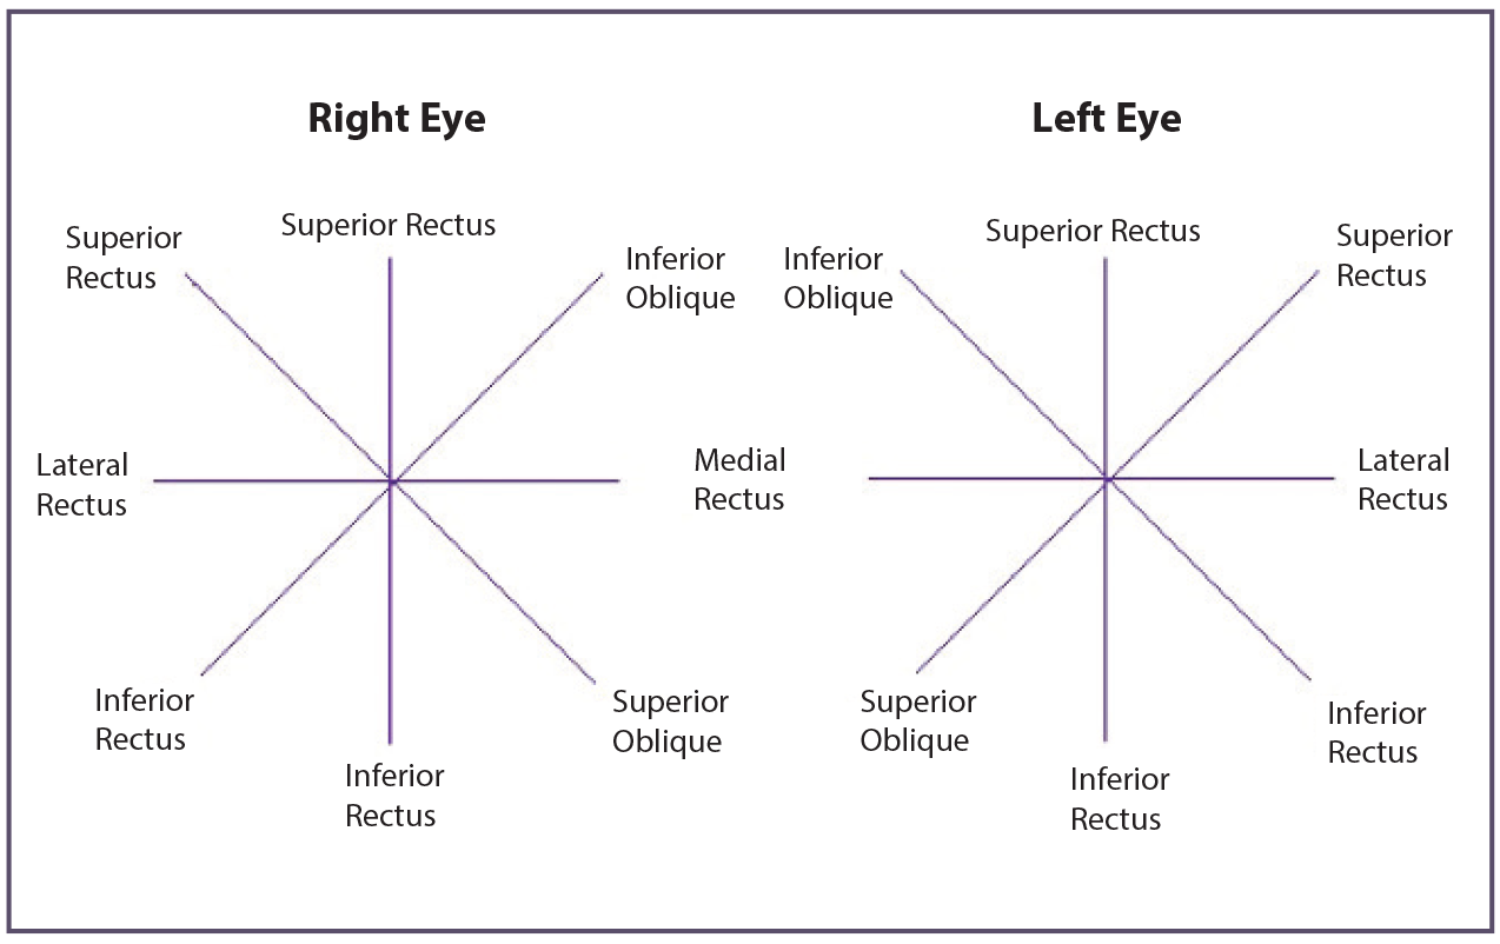
Figure 2: A summary of the extraocular muscles and the eye movements they control.
Conclusion
There are a number of elements to the examination of the visual system, which can be tricky to remember and execute in a fluid manner. With plenty of practice, and the adoption of a methodical approach from ‘front to back’ you should be able to perform a good examination of the eyes and identify basic pathology as you go along. Familiarity with equipment and good communication skills to keep your patient relaxed and compliant will help speed up and improve the quality of your examination techniques.
Declaration of Competing Interests: None declared.
To view Part 2 of this topic click here.
COMMENTS ARE WELCOME